In general, Docker containers are volatile and only run for the time it takes to execute a command. Issued to complete the container. However, there are times when the application needs to share access to save or retain data after the container is deleted. Database, user-generated content for the website files, and log files are just a few examples of data that your application needs to access, although it is impractical or impossible to include in a Docker image. Docker volumes provide persistent access to your data.
You can create and connect Docker volumes using the same commands you used to create the container.
You can create it separately from the container and attach it later. In this article, Check out four different ways to share data between containers.
1. Creating an Independent Volume.
The docker volume creates command was introduced in Docker 1.9 and creates a volume without associating it with a specific container. Use this command to add a volume named my data
$ docker volume create --name mydata
A name is displayed indicating that the command was successful.
To use the volume, use -rm to create a new container from the Ubuntu image. A flag that automatically clears when finished. Also, use -v to mount the new volume. -v Requires volume name, colon, and the absolute path to the destination of volume It will be displayed in the container. If the directory in the path does not exist as part of the image, it will be created when you run the command. If they are present, the mounted volume hides the existing content.
$ docker run -ti --rm -v mydata:/c_mydata ubuntu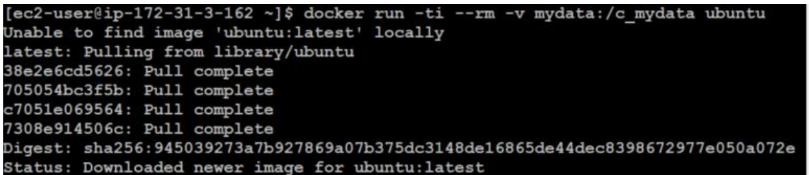
Let’s write data to the volume in the container.
root@4655a7fa1db9:/# echo "this is sample data written in container " >
/c_mydata/Example.txt
Due to the use of the –rm flag, the container is automatically deleted on exit. our volume, However, you can still access the volume.
root@4655a7fa1db9:/# exit
You can use docker volume inspect to verify that the volume exists on your system.
[ec2-user@ip-172-31-3-162 ~]$ docker volume inspect mydata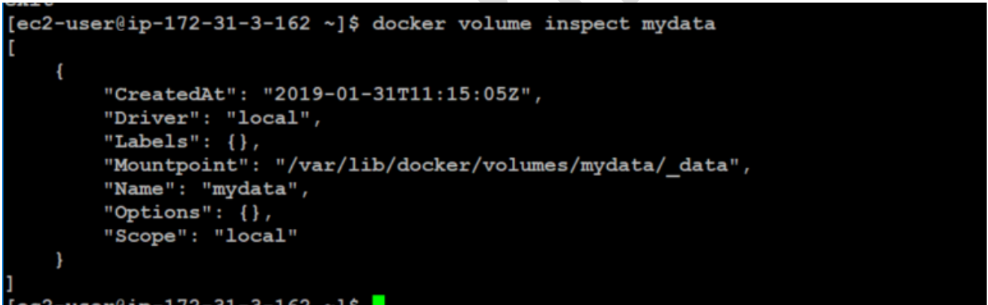
Then launch a new container and attach my data.
[ec2-user@ip-172-31-3-162 ~]$ docker run --rm -ti -v mydata:/mydata1 ubuntuLet’s Verify the contents
root@a3582d7cc24a:/# cat /mydata1/Example.txt
Exit the container:

In this example, we created a volume, attached it to a container, and checked its persistence.
2. Create a volume that will persist even if the container is removed.
The following example creates a volume at the same time as the container creates a container and connects the volume to the new container. Use the docker run command to create a new container on the base Ubuntu image. -t Give us a terminal, -i allows us to interact with it. For clarity, use –name to identify the container. You can use the -v flag to create a new volume called mydata2. Use a colon to separate this name from the path where the volume needs to be mounted on the container. Finally, specify the base Ubuntu image and rely on standard Ubuntu commands Use the base image bashDockerfile and place it in a shell.
[ec2-user@ip-172-31-3-162 ~]$ docker run -ti --name=Container2 -v mydata2:/c_mydata2
 ubuntu
Let’s write data to the volume inside the container.
Note: The -v flag is very flexible. You can mount or name a volume with just a slight Syntax adaptation. If the first argument starts with / or ~ /, create a bind mount. Delete it and give the volume a name.
For example:
- -v /path:/path/in/container mounts the host directory, /path at the /path/in/container
- -v path:/path/in/container creates a volume named path with no relationship to the host.
root@e6bf91a62f5e:/# echo "this data written into expmale2 file" >
/c_mydata2/Example2.txt
root@e6bf91a62f5e:/# cat /c_mydata2/Example2.txt
Let’s exit the container

The volume will be mounted automatically when you restart the container.
[ec2-user@ip-172-31-3-162 ~]$ docker start –ai Container2
Make sure the volume is actually mounted and the data is still there.
root@e6bf91a62f5e:/# cat /c_mydata2/Example2.txt
Finally, let’s the exit and clean up:

Docker does not allow you to delete a volume if it is referenced by a container. Let’s take a look for a while If you try:
[ec2-user@ip-172-31-3-162 ~]$ docker volume rm mydata2This message indicates that the volume is still in use and provides a longer version of the container ID:
Error response from daemon: remove mydata2: volume is in use -
[e6bf91a62f5eb88a33a4cdec7cc7a80426b6c3695bf1103959f94260f09ce87c]
You can use this ID to delete the container

Removing the case does not affect the volume. You can see that it still exists on the system by listing volumes using Docker volume ls
[ec2-user@ip-172-31-3-162 ~]$ docker volume ls
You can also remove it using docker volume.
[ec2-user@ip-172-31-3-162 ~]$ docker volume rm mydata2
In this example, we created an empty data volume at the same time we created a container. The following example examines what happens when you create a volume using a container directory that already contains data.
3. Create a volume from an existing directory using the data
In general, use Create and Create Docker Volumes to create volumes individually. Creating a container is equivalent to one exception. If you create the volume at the same time you create the container and specify the path to the directory that contains the data in the base image, that data will be copied to the volume.
As an example, let’s create a container and add a data volume under / var. The base image contains the data.
[ec2-user@ip-172-31-3-162 ~]$ docker run -ti --rm -v mydata3:/var ubuntuAll the contents of the base image’s /var directory are copied to the volume and you can do it by Mount this volume in a new container.

Exit the current container:
root@6d3b0587f742:/# exit
Instead of relying on the standard bash command for the base image, this time issue your own ls command. This command displays the contents of the volume without calling the shell.
[ec2-user@ip-172-31-3-162 ~]$ docker run --rm -v mydata3:/c_mydata3 ubuntu ls c_mydata3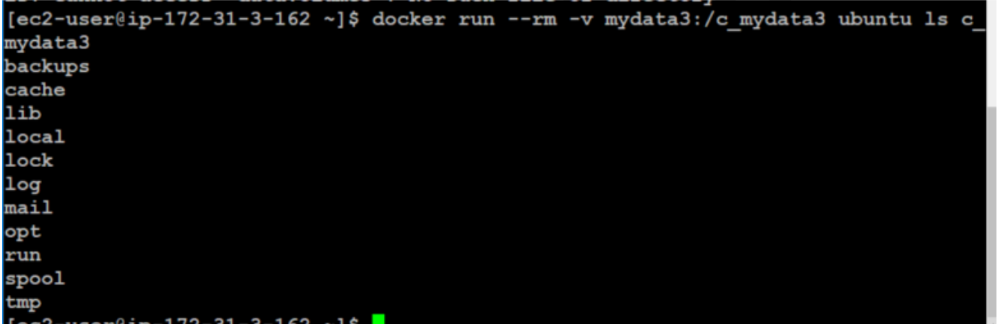
The c_mydata3 directory now contains a copy of the contents of the base image’s /var directory.
4. Share data between multiple Docker containers.
So far, you have attached one volume to each container. Often you need some containers attached to the same data volume. This is relatively easy to do, but there is one important caveat. Currently, Docker does not handle file locks. If multiple containers need to write to a volume, the applications running in those containers should be designed to write to a shared data store to prevent data corruption.
Create Container4 and mydata4
Use docker run to create a new container named Container4 with the data volume attached.
[ec2-user@ip-172-31-3-162 ~]$ docker run -ti --name=Container4 -v mydata4:/c_mydata4
 ubuntu
Next, let’s create a file and add some text.
root@0951110e9e64:/# echo "This file is shared between containers" >
/c_mydata4/Example4.txt
Then, we’ll exit the container:
root@0951110e9e64:/# exit
This will return you to the host prompt and create a new container to be deployed. Container 4 data volume.
Create Container5 and mount the volume from Container4
Create Container5 and mount Container4 volume
[ec2-user@ip-172-31-3-162 ~]$ docker run -ti --name=Container5 --volumes-from Container4
ubuntu
Let’s check the data persistence:
root@4ccbfb6b9ff2:/# cat /c_mydata4/Example4.txt
Now let’s append some text from Container5.
