
NGINX Load Balancer allows websites to handle traffic loads by distributing the traffic load to a large number of back-end servers. The load balancer also acts as a reverse proxy, protecting the backend server from being exposed. In this tutorial, we are going to see the steps involves to set up a Load balancer with NGINX on your website.
Prerequisites:
- To achieve this, we use three Ubuntu instances in AWS.
- Install Nginx for your load balancer on one machine.
- The other two machines use Nginx to serve a static website.
- First, install Docker on two and three machines.
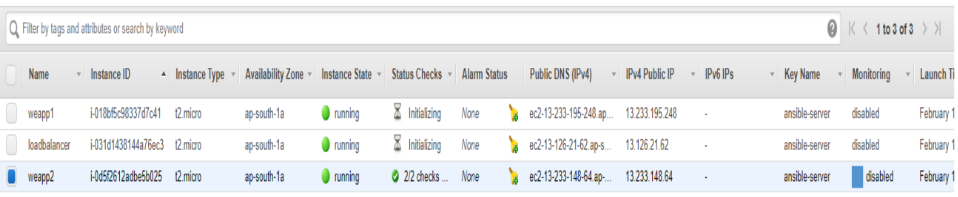
- Now, webapp1 and webapp2 run the application instance.
- The load balancer runs on the Nginx load balancer.
- First, let’s install Docker on webapp1 and awebapp2 instances (we’ll install it manually now). Then, use Ansible to automate this step to install Docker).
sudo apt-get update
sudo apt-get upgrade -y
sudo apt-get install docker.io –y
Now I will write a small static page using html
sudo mkdir -p /data/www
Create a index.html under /data/www path
cd /data/www
sudo vi index.html
<h1>Hello 1</h1>- And save it
- Create an HTML page with weapp2 as above and modify the response content for testing purposes.
sudo mkdir -p /data/www
Create a index.html under /data/www path
cd /data/www
sudo vi index.html
<h1>Hello 2</h1>- And save it
- Serves this static page on the Nginx web server
sudo docker run --name nginx -v /data/www:/usr/share/nginx/html:ro -d -p 80:80 nginx- For testing access with http://
Now let’s configure the load balancer
sudo apt-get update
sudo apt-get upgrade -y
sudo apt-get install nginx -y
Now open the /etc/nginx/nginx.conf file add your server details.
sudo vi /etc/nginx/nginx.conf
Back up the Nginx configuration file named nginx.conf. Then delete the contents of
the current file and replace the current file with the code shown below.
sudo cp nginx.conf nginx_back.confremove the content in nginx.conf file ( All lines at a timed delete:1,$d in vi editors)
ubuntu@ip-172-31-20-76:/etc/nginx$ cat nginx.conf
http {
upstream backend {
server ec2-13-233-195-248.ap-south-1.compute.amazonaws.com;
server ec2-13-233-148-64.ap-south-1.compute.amazonaws.com;
}
server {
listen 80;
location / {
proxy_pass http://backend;
}
}
}
The upstream back end, which can have any name, sets up the group of servers that perform
the load balancing. The next two lines of code define the servers, but it’s also possible to use
domain names if desired.
The second group of commands specifies that the default port 80 will accept requests.
The next two lines essentially implement the proxy service. The location / forwards all traffic for
that website or IP address to the Nginx load balancer. The proxy pass defines the group of
servers to use, which are those configured in the previous group of commands.
Next, use the following command to restart the Nginx load balancer and make the service live:
sudo systemctl reload nginxIf you see below error
Feb 18 13:50:14 ip-172-31-20-76 systemd[1]: Reload failed for A high performance
To check the syntax error use the below command
sudo nginx –t
Added event section in nginx.conf
ubuntu@ip-172-31-20-76:/etc/nginx$ cat nginx.conf
events {
worker_connections 768;
# multi_accept on;
}

http {
upstream backend {
server ec2-13-233-195-248.ap-south-1.compute.amazonaws.com;
server ec2-13-233-148-64.ap-south-1.compute.amazonaws.com;
}
server {
listen 80;
location / {
proxy_pass http://backend;
}
}
}
Finally, open a web browser and enter the IP address or URL of your front load balancer. “Hello 1” or “Hello 2” is displayed, depending on the server to which the load balancer passes the request to.